Thursday 26 May 2011


Some images of the lit drawing room.
The photographers came down and showed us the basics of how to use the cameras and lighting equipment. We went through all the possible effects that could be created with lighting e.g different size light, different filters, the barn doors and how to animate light. They also went trough the cameras and how they worked explaining the different setting such as the effect that the aperture can have on the amount of light there is is a shot. After going through all the equipment we began to think how we could light our too rooms using the techniques they had taught us. They explained how in the industry they would start with a crewed drawing of the room and how they think it should be lighted and then they get stuck in with trying to light it like that, which is what we did. We started with the study.


Once we had some decent shots on the drawing room we moved into the drawing room.

The final shoot

We had finally made it, the last day, everything had come together (I never lost hope). We just had a couple of final additions before the photographers turned up. Rhyan bought in the rugs for both rooms, we borrowed a couple of nik naks from the other group in order to fill out all the shelf space we had in the drawing room and finally Fiona had bought some fake plants and some real flowers to brighten up the drawing room. We also covered all the windows with black cloth to stop additional light coming in whilst filming and also to block out the setting of the workshop. Andy and Simon also put a black cloth over the top of the study to create a really dark setting; which personally i think was a mistake when it came to filming as it took a lot of light out of the room making it harder to light.


DEATH to the screen!

We had also decided early on that we wanted to screen to have a representation of death on it too. So Sarah and I went about distressing the screens hole section. We began by roughing up the material that we had left dangling; which turned out to be harder then expected but this some frantic snipping with a pair of scissors Sarah soon got the job done, I proceeded to apply black paint roughly around the hole to hopefully achieve the effect of 'death' penetrating the screen. once the paint was dry more french polish was applied to some of the surrounding frame and running down the legs. The effect was most horrific!


Death corner...the second attempt

After some deliberation with simon and a couple of other group members Sarah and I decided to further abuse the 'death corner' We thought that french polish was a good idea as when splashed with water gave a really convincing white mould effect. We simple applied liberal amounts of french polish and then splashed with large amounts of water which gave a really horrific white mould that both me and sarah adored but unfortunately the other group members thought otherwise so me and sarah dulled it down slightly with the addition of more french polish but without the presence of water this time.

Panelling

The paneling was a group effort. Simon showed us the basics and we all chipped in to get it done. We started with the skirting board. 20mm MDF was used to make the skirting board. We used spaces behind it to make appear wider then it was. Once these where drilled into the flats the first layer of paneling was placed on to on this being drilled straight into the wall with no spacer.
Once the bottom of the paneling was attached the up right pieces could be attached. We had a guide piece of ply wood that was the right size for the centre of the paneling which we placed in the middle of the wall, we then placed an up right either side of this and drilled then into the wall to look something like this...
This image shows the finished paneling. The top pieces have been attached (done the same way as the bottom) and all the screws have been poly fillered. Once these were done Callum used the hand held router to give a nice curved edge to all the inside panel pieces and also the top edge.

Once this was done they were ready to be painted, but just before that I had to mask of all the centre panels so that they didn't get any paint on them potentially ruining the wood grain effect they had already been given.

The deathly corner

Sarah and I still had to create out death corner where the screen would stand. The idea is that its a metaphor for death within the room. The main aim was to create a decaying corner that represented 'death' we choose to move away from the idea of personification fairly early on in the project as it would seem quite 'disney' with the budget we had and it would be hard to come up with an original concept and make it within the time we had. We had a rough idea of what we wanted - a dark corner with forms of mould/ drips/ decay and an indication of growth into the room. We began by putting down a base coat of black and very dar brown to get an idea of size and shape, we initially drew the size of the screen on the floor to ensure the right coverage was made. Once a base coat was applied we used more black and brown applied using sponges so that it seemed like a very random coverage. We wanted to build up some real texture. To get further texture we used saw dust and wood chippings to add a bit more bulk. We used water and sponge to bleed out the edges on the blackness to give the idea of growth as well. This also gave us a really good dripping effect running down the wall which we really liked and applied to most areas of the wall. We also got a good effect from rubbing areas on wet paint away from the dry paint below to leave patchy green and black areas.


Additional lighting

Lauren bought in this, a metal wall mount with fake plastic candles on it. We wanted to make it more authentic, and decided to to remove the plastic candle and lamp fittings and attach candles.

It left us with a small plastic fitting which we simply painted gold with the intention covering in wax.
We attached two candles, and then melted additional wax over the holder. We decided that the study would have been lacking light with only the two hand held candles so we decided that this piece should be placed over the desk in the study. It was simply fixed to the wall using two screws in two pre made screw wholes.

Hand held candles??

For the deathly corner in the study Kirby and I had decided that candles being held in some way by hands would be a good idea as hands and mentioned in the book and are associated with death in the book. We consulted simon on the best way to do this and he suggested casting a hand using Alginate. He began by giving us this tube in which Kirby could place her hand and the Alginate could be poured into.


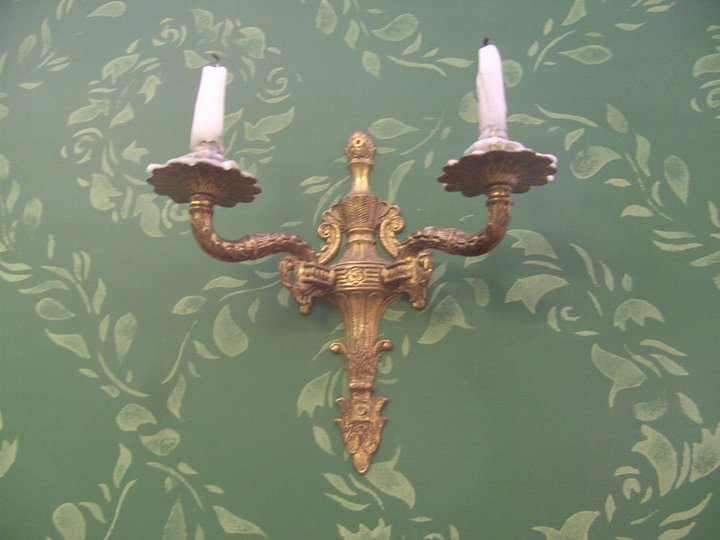
Simon then showed us how to mix the alginate. One part alginate to one part water. We used a jug and and small pot to get enough for our tube.
Once the alginate was mixed in a bowl it was poured into the tube and then Kirby had to quickly get her hand into the tube and adjust it into the right position. The alginate took just over 5 minutes to go off.
Because of its rubbery consistency once gone off Kirby could pull her hand out of the mould without damaging it.
Once the mould was made we used plaster to cast the hand. To do this we got a bowl of water and slowly added plaster powder to the water until it was just under the water line, then simple stirred it around with our hands for a couple of seconds. Then we simply poured the plaster into the alginate mould and left it about an hour.

The tube that simon had made was easily dismantled and left the alginate inside, we simply used a scalpel to cut away the alginate (making sure not to ruin it as we needed to make two hands and would need to use the mould again) The alginate came away fairly easily and was not ruined for the next cast. We removed the first plaster cast and then resembled the tube with the alginate mould inside. We mixed some more plater and repeated the previous process but create a second hand cast.
We decided to paint the hands gold to stay with the baroque theme.
After a couple of experiments with other candles we wanted to create a really aged effects using layers and layers of candle wax. I really like the effect this creates as its a typical but timeless horror element.

We wanted to place the the two hand candles in the study either side of the screen as they would had to the horror corner that was to be created. We decided to use raw plugs in the back of the hand in order to attach them to the wall, unfortunately we failed to realise that when these are used they open up and therefore when attaching the hand they both cracked quite badly. Luckily using super glue and poly filler the situation was rectified both hands stayed on the wall.

Hanging doors

Callum and Fiona were given the task of create the doors and door frames but Callum asked me if I would help hang the doors which I did. A simple task which involved chiselling out spaces for the hinges in the door frame then attaching the hinges to the doors and the frames.

Lighting

Kirby and I were in charge of lighting for the set, but while I had some time spare while making the screen I made a start. I consulted the autocad sketches I had created, I decided to start by trying to work how I would make the glass flute section of the light as I thought this would be the hardest section. I thought a plastic bottle would be the easiest solution, but initially it was hard to find a single bottle with the correct shape. Luckily my brain kicked in and thought that if I used a long section from one bottle and a stumpy rounded top from another I could create almost the perfect solution. By using a bottle top to create the bottom of the flute it sparked another idea. If i used styrofoam to create the middle 'brass' section I could carve a bottle top shaped hole and simply screw the 'glass flute' into the 'brass body' easily. I carved a circular piece of styrofoam from the left overs of the screen and rounded it to create the brass body. My autocad sketches showed a reservoir for the oil on the under side of the brass body, this was easily made from another bottle top and a bottle cap glued onto the bottom of that. Once this was done I made the wall mounts for the lights. I simply drew out a rough oval shape onto a piece of MDF and cut it using the band saw I then sanded it down to give and even shape and smooth sides, a quick lick of brown and black paint and some varnish and they were done. I then added a small dowel to attach the wall mouth to the actual light. I small nail painted gold was then glued to the side of the lower flute section to look like the lighting mechanism of the oil lamp.


After consulting with Kirby we decided to try and create a working light mechanism for the inside of the light. We decided that a dismantled fake tea light would be the best way to go as it would give of a realistic light and also the mechanism would be small enough to fit into the styrofoam body of the light.

So after a trip to the 99p shop and returned with some 'scented flameless candle' (bizarre eh?!) after a quick fiddle we managed to open these small candles to get the basic mechanism out (a light, battery and a switch). Where I had initially attached screwed the top flute in I cut right through the styrofoam body to live a whole right through to the main body. This allowed us to place the mechanism is with the switch and the battery and the bottom of the main body and the light extending up through to emerge at the bottom of the flute. To switch the lights on and off all that had to be done was remove the bottle caps that had been glued on to the bottom, so now it was detachable to allow the switch to be accessible.

Just as we were about to attach the light to the wall we decided to change the design slightly, Kirby and I werent really happy with the spiky decoration I had added previously. We didn't think it accurately depicted the baroque period and looked slightly childish. We decided to go with the autocad sketches in the end and add a simple gold band as it felt more classy.
We were advised to place the lights next to the mirror in the drawing room and after some deliberation we decided to go with it, we simply measured horizontally and vertically in order to get the right height and equal widths form the mirror.... Heres the finished result.


Braces

Once the group had put all the flats together braces were constructed. These would act like a belt wrapping round the whole set to keep it all together and strong. They were made by butting two planks together and drilling them together they were then fit to the top and middle of the set. The small room only needed bracing round the middle as its smaller construction made it slightly more sturdy where as the larger drawing room needed bracing at the top and middle.

Wednesday 25 May 2011

Some slight issues that arose were that some of the flats were slightly miss shapen some how, either through the use of bowed wood or slightly wonky (technical term) construction. Unfortunately not much could be down to rectify this problem, luckily we only had a couple of flats with a problem and none of them were majorly wrong. This being one of the worst...

Henry explained how to attach the flats in the simplest way to make the strongest room. Always start in the corner with two people firmly holding the flats together making sure with a spirit level that they are straight and also that they are at a right angle. After a corner is created the room can be built from there, attaching the flats to one another by screwing the two long sides together always starting at the bottom and always making sure the flats are flush together as you move up the flat.


Joining the flats

Once all the individual flats had been constructed we had to put them together to form our rooms. We had a session in the morning with Henry Jones, he showed us the basics of joining the flats. We began by laying out the correct flats around the room so they were all roughly in the right place when it came to attaching them all together.


The next stage was to attach the three panels together. Unfortunately once the hinges where attached the outer panels didn't fold round like they should have due to the baton attached just above the legs also the screen seem to lean back quite a lot due to it being rather top heavy. This was fairly quickly rectified by cutting the feet and a slight slant and also sawing the corners of the two outer batons off to allowing the outer panels to swing round more, all we had to do then was paint over the bits we'd just cut and the screen was all finished.


Once the paper mache was dry we began to paint the frame sections so as not to ruin the fabric by painting them when all the layers were stuck together. We began by trying to create a wood grain effect by due the lack of paint colour options we decided to go for a darker burnt look. We painted a dark brown colour then with a dry brush we added black high lights. Once this was dry sarah used a bronze paint to add highlights to the raised detail. She also painted the winged hourglass and used the same bronze paint to give a shimmering highlight. Finally we added french polish all over the screen to give an ornate feel, also with french polish if u add water it gives a worn almost mouldy feel which we thought would really add to the deathly feel we wanted to create in the corner. Once the polish was dry (it was very quick drying) We stuck all the layers of the screen together using evo stick a contact adhesive that I was informed is very reliable for such jobs. We left all three panels to dry over night using clamps to make sure of a solid stick. The bat wing motif was stuck in the centre of the panel using araldite and two screws through the back.


We needed to create more defined legs for the screen so I got some styrofoam blocks, 2x (300mmx600mm) at 50mm thick for £8. These would add a bit more bulk to the screen and would be easy to shape. I traced the shape of the legs on to the styrofoam blocks and cut them on the band saw. Sarah and I then used craft knives, sand paper and a mouse sander to round the legs giving them a smoothes 'leg' like shape sarah and I also decided to add dog like foot shape to the bottom of each foot as this was popular in the baroque movement. Before we attached them we added a pine baton, with a routed edge, just above were the legs would attach to give a bit more bulk and smoother transition to the rest of the screen. We then attached the legs to the MDF using PVA glue.


Adding fabric to the screen

By using the frame section of the screen to draw a template on the the solid section we could see how big the fabric needed to be. In the original design only the outer panels had fabric inlays but we had enough spare to cover the central panel too so we did as we prefered this textured finish to just a painted effect. On the sections of the screen that had the smashed hole we merely notched the fabric with the intention of pinning it around the back later.